
Try growing potatoes this spring
By Nick Frillman Local foods educator University of Illinois Extension Services — March 20, 2022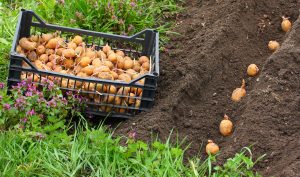
Plant potato seeds in holes 3 inches deep with 6-8 inches apart both within and between rows. Cover the potatoes with soil and compost, then water them in.
It’s almost gardening time. My family’s garden starts on April 1 with the planting of potatoes and onions. Here I will describe the procedure for successful potato production.
If you’ve never grown potatoes in your garden, try something different this year. Here are some helpful steps to achieve a successful crop of potatoes this year:
- When you get your seed potatoes from the garden center or seed supplier, they’ll be whole potatoes with tiny growths called “eyelets”—you want to cut seed potatoes into quarters.
- Cut your potatoes six to 10 days before the desired planting date. Ensure each piece of seed potato contains at least one eyelet, preferably two.
- Store your cut potato seed in a cool, dark place with good airflow, basements are a good storage location.
- Make sure your soil is loose, potatoes don’t appreciate tough ground. To loosen the soil, you could use a rototiller, but a pitchfork or broadfork will aerate and loosen the soil without damaging the soil structure and exposing new weed seed.
- Incorporate a general-purpose fertilizer (15-15-15), according to package label instructions, and two to three inches of compost, into the soil.
- Plant potato seeds in holes 3 inches deep with six to eight inches apart both within and between rows. Cover the potatoes with soil and compost, then water them in.
- Depending on potato variety, and weather conditions, potatoes take two to four weeks to emerge from the soil—focus on weeding and watering until plants are six to eight inches tall.
- Approximately 60 days after planting, tubers (immature potatoes) will be forming. If June is hot, maintain soil moisture — moist soil will help developing potato tubers stay cool, good tubers won’t form if the soil temperature is above 70-75 degrees.
- When potato tubers begin forming, add two more inches of compost around the base of each emerged plant — a process called “hilling”, add two to four inches of straw, as well, to retain soil moisture.
- Hill the developing potato tubers to avoid exposing them to sunlight. If this happens, the tubers will turn green and become slightly poisonous.
- After approximately 100 days, depending on variety, your potatoes are ready to harvest! Loosen the soil and pull up a plant by its top to examine potato tubers.
- Use sharp snips to clip roots that attach tuber to plant. Handle tubers gently during harvest — a bruised tuber will rot in storage. With harvest complete, it is time for drying and curing.
Consult Extension resources for drying and curing techniques.
Lastly, here is my potato pro tip: keep potato area free of weeds. Weedy potato plants will produce small, sad tubers instead of big, happy tubers. Happy gardening!
Trending News
 Two killed in Eden Expressway ...Two people were killed in accidents on the Edens Expressway. A three-unit ...
 With scant notice, Rockford hospital ...Residents on Rockford’s west side are feeling abandoned and betrayed after Javon ...
 Highland Park parade ‘full of ...Highland Park’s Fourth of July events included a parade which stepped off ...
 Woman charged with killing boy ...A Chicago woman has been charged with murder in connection with the ...